2017年7月3日 星期一

2017年6月5日 星期一
week16 作品完成教學
week16
利用 滑鼠 按鍵 來做 機器人
1.內差公式
2.存檔 讀檔
3.利用Tinear自動內插
4.鍵盤+滑鼠
利用內插法來做

加入程式碼

存檔 讀檔
todo:
#include <stdio.h>
FILE*fout=NULL; 先宣告 檔案為空值
if(key=='s'||key=='S') //鍵盤 s 大小寫
{
if(fout==NULL) fout=fopen("file.text","w+"); 存檔
fprintf(fout,"%.3f %.3f %.3f %.3f\n",angle[1],angle[2],angle[3],angle[4]...); 印出每個輸出
}
開檔
if(key=='r' || key=='R'){
if(fin==NULL){///read讀檔案的第2行
fin=fopen("file.txt", "r");///read讀檔案的第3行
}
fscanf(fin, "%f %f %f %f %f", &angle[0], &angle[1], &angle[2], &angle[3], &angle[4]);///read讀檔案的第4行
glutPostRedisplay();///read讀檔案後, 要重畫畫面
}
利用 滑鼠 按鍵 來做 機器人
1.內差公式
2.存檔 讀檔
3.利用Tinear自動內插
4.鍵盤+滑鼠
利用內插法來做

加入程式碼

存檔 讀檔
todo:
#include <stdio.h>
FILE*fout=NULL; 先宣告 檔案為空值
if(key=='s'||key=='S') //鍵盤 s 大小寫
{
if(fout==NULL) fout=fopen("file.text","w+"); 存檔
fprintf(fout,"%.3f %.3f %.3f %.3f\n",angle[1],angle[2],angle[3],angle[4]...); 印出每個輸出
}
開檔
if(key=='r' || key=='R'){
if(fin==NULL){///read讀檔案的第2行
fin=fopen("file.txt", "r");///read讀檔案的第3行
}
fscanf(fin, "%f %f %f %f %f", &angle[0], &angle[1], &angle[2], &angle[3], &angle[4]);///read讀檔案的第4行
glutPostRedisplay();///read讀檔案後, 要重畫畫面
}
2017年5月22日 星期一

2017年5月15日 星期一
Week13
T-R-T 考試練習打
glPushMatrix();
glTranslatef(-0.5,0.35,0); 移動到正確位置
glRotatef(-angle,0,0,1);(左負右正)or(angle加負號)
glTranslatef(-0.3,0,0);移動到中心原點(all of 加分號)
drawArm(); 老師指定函數
glPopMatirx();
1.小考:T-R-T 觀念
2.讀圖檔
3.設定貼圖
4.轉動的地方
5.homework
如何讀檔:
先download Opencv
start download

開啟codeblcok
file->new->project->console application
選C++
看圖吧...


code:
#include <opencv/highgui.h>
int main()
{
IplImage*img=cvLoadImage("C:/img.png"); //開啟folder名稱
cvShowImage("a",img); //"a"是框框名稱 img是檔類型
cvWaitKey(0);
}
旋轉地球


glPushMatrix();
glTranslatef(-0.5,0.35,0); 移動到正確位置
glRotatef(-angle,0,0,1);(左負右正)or(angle加負號)
glTranslatef(-0.3,0,0);移動到中心原點(all of 加分號)
drawArm(); 老師指定函數
glPopMatirx();
1.小考:T-R-T 觀念
2.讀圖檔
3.設定貼圖
4.轉動的地方
5.homework
如何讀檔:
先download Opencv
start download

開啟codeblcok
file->new->project->console application
選C++
看圖吧...


code:
#include <opencv/highgui.h>
int main()
{
IplImage*img=cvLoadImage("C:/img.png"); //開啟folder名稱
cvShowImage("a",img); //"a"是框框名稱 img是檔類型
cvWaitKey(0);
}
旋轉地球


2017年5月8日 星期一
Week12 3DTRT轉動 矩陣 攝影機運鏡 會動機器人
TODO: jsyeh,org/3dcg10 download
data.zip-->desktop\windows\data\模型.obj
windows.zip-->desktop\windows\progection.exe
glut32.dll-->desktop\windows\glut32.dll
TODO: glutLookAt(eyeX,eyeY,eyeZ)<-- 攝影機
centerX,centerY,centerZ
upX , upY , upZ,
將data folder 跟glut32.dll 放入windows

執行結果如下

開啟 coding block
OpenGLUT 執行 freeglut folder

修改code

#include <GL/glut.h>
#include <math.h>
float eyeX=0,eyeY=0,eyeZ=1;
float centerX=0,centerY=0,centerZ=0;
float upX=0,upY=1,upZ=0;
static void display(void)
{
glClear(GL_COLOR_BUFFER_BIT | GL_DEPTH_BUFFER_BIT);
glColor3d(1,0,0); 顏色RBG
glPushMatrix();
gluLookAt(eyeX,eyeY,eyeZ,centerX,centerY,centerZ,upX,upY,upZ); 攝影機
glutSolidTeapot(0.3); 茶杯大小
glPopMatrix();
glutSwapBuffers();
}
glutIdleFunc(display); 修改這行

新增code:
float angle=0;
angle+=0.01;
eyeZ=cos(angle); eyeY=sin(angle);

code:
#include <GL/glut.h>
#include <math.h>
float eyeX=0,eyeY=0,eyeZ=1;
float centerX=0,centerY=0,centerZ=0;
float upX=0,upY=1,upZ=0;
float angle=0;
static void display(void)
{
glMatrixMode(GL_PROJECTION);// 新增
glLoadIdentity();新增
gluPerspective(60,1,0.001,10000);新增
glMatrixMode(GL_MODELVIEW);新增
angle+=0.01;
eyeZ=cos(angle); eyeY=sin(angle);
glClear(GL_COLOR_BUFFER_BIT | GL_DEPTH_BUFFER_BIT);
glColor3d(1,0,0);
glPushMatrix();
gluLookAt(eyeX,eyeY,eyeZ,centerX,centerY,centerZ,upX,upY,upZ);
glutSolidTeapot(0.3);
glPopMatrix();
glutSwapBuffers();
}
機器人

code:
data.zip-->desktop\windows\data\模型.obj
windows.zip-->desktop\windows\progection.exe
glut32.dll-->desktop\windows\glut32.dll
TODO: glutLookAt(eyeX,eyeY,eyeZ)<-- 攝影機
centerX,centerY,centerZ
upX , upY , upZ,
將data folder 跟glut32.dll 放入windows

執行結果如下

開啟 coding block
OpenGLUT 執行 freeglut folder

修改code

#include <GL/glut.h>
#include <math.h>
float eyeX=0,eyeY=0,eyeZ=1;
float centerX=0,centerY=0,centerZ=0;
float upX=0,upY=1,upZ=0;
static void display(void)
{
glClear(GL_COLOR_BUFFER_BIT | GL_DEPTH_BUFFER_BIT);
glColor3d(1,0,0); 顏色RBG
glPushMatrix();
gluLookAt(eyeX,eyeY,eyeZ,centerX,centerY,centerZ,upX,upY,upZ); 攝影機
glutSolidTeapot(0.3); 茶杯大小
glPopMatrix();
glutSwapBuffers();
}
glutIdleFunc(display); 修改這行

新增code:
float angle=0;
angle+=0.01;
eyeZ=cos(angle); eyeY=sin(angle);

code:
#include <GL/glut.h>
#include <math.h>
float eyeX=0,eyeY=0,eyeZ=1;
float centerX=0,centerY=0,centerZ=0;
float upX=0,upY=1,upZ=0;
float angle=0;
static void display(void)
{
glMatrixMode(GL_PROJECTION);// 新增
glLoadIdentity();新增
gluPerspective(60,1,0.001,10000);新增
glMatrixMode(GL_MODELVIEW);新增
angle+=0.01;
eyeZ=cos(angle); eyeY=sin(angle);
glClear(GL_COLOR_BUFFER_BIT | GL_DEPTH_BUFFER_BIT);
glColor3d(1,0,0);
glPushMatrix();
gluLookAt(eyeX,eyeY,eyeZ,centerX,centerY,centerZ,upX,upY,upZ);
glutSolidTeapot(0.3);
glPopMatrix();
glutSwapBuffers();
}
機器人

code:
#include <GL/glut.h>
#include <math.h>
float eyeX=0, eyeY= 0, eyeZ= 2;
float centerX=0, centerY=0, centerZ=0;
float upX=0, upY=1, upZ=0;
float angle=0, dir=1;;
static void display(void)
{
glMatrixMode(GL_PROJECTION);
glLoadIdentity();
gluPerspective(60, 1, 0.001, 10000);
glMatrixMode(GL_MODELVIEW);
angle+=dir;
if(angle>60) dir=-dir;
if(angle<0) dir=-dir;
glClear(GL_COLOR_BUFFER_BIT | GL_DEPTH_BUFFER_BIT);
glColor3d(1,0,0);
glPushMatrix();
gluLookAt(eyeX, eyeY, eyeZ,
centerX, centerY, centerZ,
upX, upY, upZ);
glPushMatrix();
glColor3f(1,0,0);
glutSolidTeapot(0.3);///head
glPushMatrix();
glTranslatef(0, -0.3, 0);
glColor3f(1,1,1);
glutSolidTeapot(0.3);///body
glPushMatrix();
///glTranslatef(0.6,0,0);///old rotate
glTranslatef(0.3,0,0);/// T
glRotatef(angle, 0,0,1);///R
glTranslatef(0.3,0,0);/// T
glutSolidTeapot(0.3);///right upper arm
glPushMatrix();
glTranslatef(0.3, 0,0);///T
glRotatef(angle, 0,0,1);///R
glTranslatef(0.3, 0,0);///T
glutSolidTeapot(0.3);///right lower arm
glPopMatrix();
glPopMatrix();
glPushMatrix();
///glTranslatef(0.6,0,0);///old rotate
glTranslatef(-0.3,0,0);/// T
glRotatef(-angle, 0,0,1);///R
glTranslatef(-0.3,0,0);/// T
glutSolidTeapot(0.3);///left upper arm
glPushMatrix();
glTranslatef(-0.3, 0,0);///T
glRotatef(-angle, 0,0,1);///R
glTranslatef(-0.3, 0,0);///T
glutSolidTeapot(0.3);///left lower arm
glPopMatrix();
glPopMatrix();
glPopMatrix();
glPopMatrix();
glPopMatrix();
glutSwapBuffers();
}
const GLfloat light_ambient[] = { 0.0f, 0.0f, 0.0f, 1.0f };
const GLfloat light_diffuse[] = { 1.0f, 1.0f, 1.0f, 1.0f };
const GLfloat light_specular[] = { 1.0f, 1.0f, 1.0f, 1.0f };
const GLfloat light_position[] = { 2.0f, 5.0f, 5.0f, 0.0f };
const GLfloat mat_ambient[] = { 0.7f, 0.7f, 0.7f, 1.0f };
const GLfloat mat_diffuse[] = { 0.8f, 0.8f, 0.8f, 1.0f };
const GLfloat mat_specular[] = { 1.0f, 1.0f, 1.0f, 1.0f };
const GLfloat high_shininess[] = { 100.0f };
/* Program entry point */
int main(int argc, char *argv[])
{
glutInit(&argc, argv);
glutInitWindowSize(640,480);
glutInitWindowPosition(10,10);
glutInitDisplayMode(GLUT_RGB | GLUT_DOUBLE | GLUT_DEPTH);
glutCreateWindow("GLUT Shapes");
///glutReshapeFunc(resize);
glutDisplayFunc(display);
///glutKeyboardFunc(key);
///glutIdleFunc(idle);
glutIdleFunc(display);
glClearColor(1,1,1,1);
///glEnable(GL_CULL_FACE);
///glCullFace(GL_BACK);
glEnable(GL_DEPTH_TEST);
glDepthFunc(GL_LESS);
glEnable(GL_LIGHT0);
glEnable(GL_NORMALIZE);
glEnable(GL_COLOR_MATERIAL);
glEnable(GL_LIGHTING);
glLightfv(GL_LIGHT0, GL_AMBIENT, light_ambient);
glLightfv(GL_LIGHT0, GL_DIFFUSE, light_diffuse);
glLightfv(GL_LIGHT0, GL_SPECULAR, light_specular);
glLightfv(GL_LIGHT0, GL_POSITION, light_position);
glMaterialfv(GL_FRONT, GL_AMBIENT, mat_ambient);
glMaterialfv(GL_FRONT, GL_DIFFUSE, mat_diffuse);
glMaterialfv(GL_FRONT, GL_SPECULAR, mat_specular);
glMaterialfv(GL_FRONT, GL_SHININESS, high_shininess);
glutMainLoop();
return EXIT_SUCCESS;
}
2017年4月17日 星期一
Week09-讀入3D模型
到 siteweb: jsyeh.org/3dcgIO download sources.zip (glm.h,glm.cpp)
執行結果

windows.zip -->desktop\windows\transformation.exe
data.zip --> desktop\windows\data\soccerball.obj
glut32.dll --> desktop\windows\glut32.dll
freeglut 要拉出來
freeglut 要拉出來
(1) 切換模型
(2)開啟soccervall.obj /.mtl ;
v開頭 vertex ;
vn開頭 vertex normall ;
vt 開頭 vertex texture coordinate;
f 開頭 face 臉面;
開啟 soccervall.obj(notepad++ puase mouse with R)


freeglut :


執行結果

老師教的
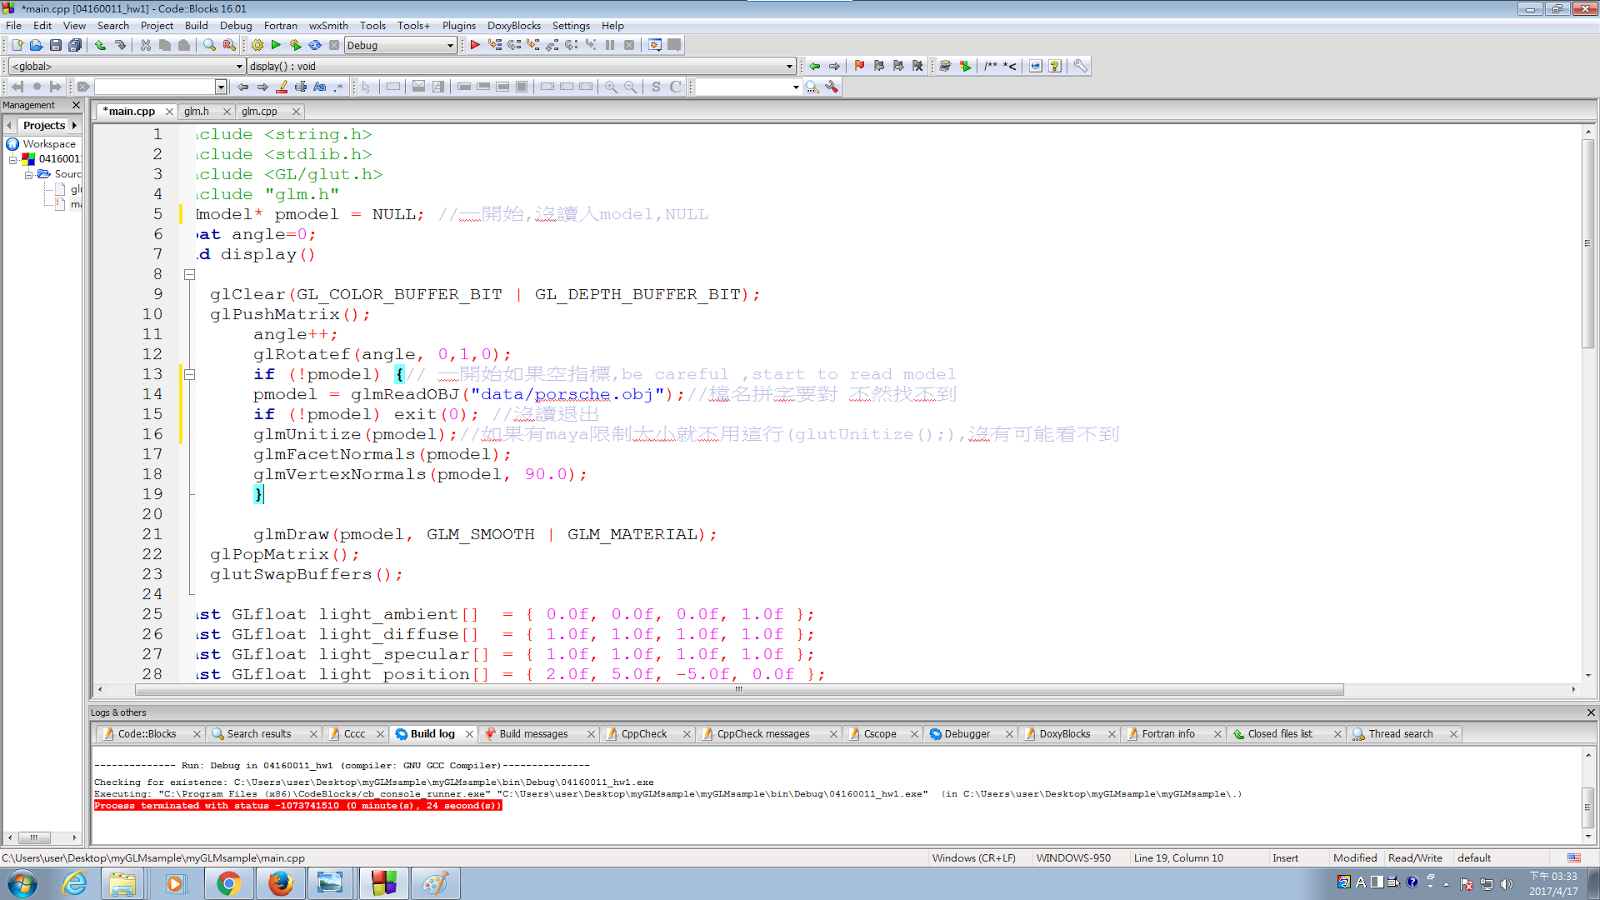
程式碼:
#include <string.h>
#include <GL/glut.>
#inlcude "glm.h"
GLMmodel* pmodel = NULL;
void dispaly()
{
glClear(GL_COLOR_BUFFER_BIT | GL_DEPTH_BUTTER_BIT );
if (!pmodel) {
pmodel = glmReadOBJ("data/porsche.obj");
if(!pmodel) exit(0);
glmUnitize(pmodel);
glmFaceNotmals(pmodel);
glmVertexNotmal(pmodel,90.0);
}
glmDraw(pmodel,GLM_SMOOTH | GLM_MATERIAL);
glutSwapBuffers();
}
int main (int argc,char**argv)
{
glutInit(&argc,argv);
glutInitDispalyMode(GLUT_DOUBLE | GLUT_DWPTH_BIT | GLUT_RGB) ;
glutCreateWindow("Here is #D show!!");
glutDispalyFunc();
}
截圖說明: 程式碼


程式碼:
#include <string.h>
#include <GL/glut.>
#inlcude "glm.h"
GLMmodel* pmodel = NULL;
void dispaly()
{
glClear(GL_COLOR_BUFFER_BIT | GL_DEPTH_BUTTER_BIT );
if (!pmodel) {
pmodel = glmReadOBJ("data/porsche.obj");
if(!pmodel) exit(0);
glmUnitize(pmodel);
glmFaceNotmals(pmodel);
glmVertexNotmal(pmodel,90.0);
}
glmDraw(pmodel,GLM_SMOOTH | GLM_MATERIAL);
glutSwapBuffers();
}
int main (int argc,char**argv)
{
glutInit(&argc,argv);
glutInitDispalyMode(GLUT_DOUBLE | GLUT_DWPTH_BIT | GLUT_RGB) ;
glutCreateWindow("Here is #D show!!");
glutDispalyFunc();
}
截圖說明: 程式碼


2017年4月10日 星期一
Week08-打光
今天要教茶壺打光
首先要先開檔 code block -> project->GLUT project ,到FB 下載freeglut
之後先打
static void display(void)
{
glClear(GL_COLOR_BUFFER_BIT | GL_DEPTH_BUFFER_BIT);
glPushMatrix();
// glTranslatef(0,0.6,0);
// glRotatef(30,0,1,0);
glutSolidTeapot(0.3);
glPopMatrix();
glutSwapBuffers();
}

之後開始兩個茶壺,一個選轉一個不動
讓茶壺旋轉的程式碼 glutIdleFunc(display);
/兩個茶壺程式碼
static void display(void)
{
angle++; 角度增加
glClear(GL_COLOR_BUFFER_BIT | GL_DEPTH_BUFFER_BIT);
glPushMatrix();//{
glTranslatef(0,0.6,0); 移動0.6向上(y軸)
glRotatef(angle,0,1,0);旋轉
glutSolidTeapot(0.3); 呼叫茶壺
glPopMatrix();//}
glPushMatrix();
glutSolidTeapot(0.3);
glPopMatrix();
glutSwapBuffers();
}

打光
const GLfloat light_position[] = { 2.0f, -5.0f, -5.0f, 0.0f };

開始用不同形狀
glutWireSphere(0.4,15,5);//圓形


glutSolidIcosahedron(); 多邊形

glutSolidCone(0.2.0.5.50.50); //角錐

END...
首先要先開檔 code block -> project->GLUT project ,到FB 下載freeglut
之後先打
static void display(void)
{
glClear(GL_COLOR_BUFFER_BIT | GL_DEPTH_BUFFER_BIT);
glPushMatrix();
// glTranslatef(0,0.6,0);
// glRotatef(30,0,1,0);
glutSolidTeapot(0.3);
glPopMatrix();
glutSwapBuffers();
}

之後開始兩個茶壺,一個選轉一個不動
讓茶壺旋轉的程式碼 glutIdleFunc(display);
/兩個茶壺程式碼
static void display(void)
{
angle++; 角度增加
glClear(GL_COLOR_BUFFER_BIT | GL_DEPTH_BUFFER_BIT);
glPushMatrix();//{
glTranslatef(0,0.6,0); 移動0.6向上(y軸)
glRotatef(angle,0,1,0);旋轉
glutSolidTeapot(0.3); 呼叫茶壺
glPopMatrix();//}
glPushMatrix();
glutSolidTeapot(0.3);
glPopMatrix();
glutSwapBuffers();
}

打光
const GLfloat light_position[] = { 2.0f, -5.0f, -5.0f, 0.0f };

開始用不同形狀
glutWireSphere(0.4,15,5);//圓形


glutSolidIcosahedron(); 多邊形

glutSolidCone(0.2.0.5.50.50); //角錐

END...
2017年3月27日 星期一
Week06-階層轉動 T-R-T and rotate
今天要教rotate:
hw_1:
先把檔案下載下來解壓縮,總共3個檔 把data folder 跟glut32.dll放到windows 裡 這樣才可以跑裡面的。
圖學網頁:jsueh,org./3dcg10
下載檔案:
data.zip>desktop>windows\data\3D
windows>desktop>windows\transformation.exe
glut32.dll>desktop>windows\glut32.dll
1. 可以打開試試 transformation 旋轉方向 (安培右手定則大拇個為旋轉軸 四指為方向)
練習各種轉法

2.
glTranslatef 移動位置
glRotatef 旋轉
如果 translate 放在rotate 前面,車子自轉
但是 rotate 放在translate 前面,,車子沿著圓外轉

hw_1:
先把檔案下載下來解壓縮,總共3個檔 把data folder 跟glut32.dll放到windows 裡 這樣才可以跑裡面的。
圖學網頁:jsueh,org./3dcg10
下載檔案:
data.zip>desktop>windows\data\3D
windows>desktop>windows\transformation.exe
glut32.dll>desktop>windows\glut32.dll
1. 可以打開試試 transformation 旋轉方向 (安培右手定則大拇個為旋轉軸 四指為方向)
練習各種轉法

2.
glTranslatef 移動位置
glRotatef 旋轉
如果 translate 放在rotate 前面,車子自轉
但是 rotate 放在translate 前面,,車子沿著圓外轉

2017年3月13日 星期一
Week03
week03_hw1
今天要教如何實作:glutMouseFunc();// gultMotionFunc();// 如何製作滑鼠動作(圓形/移動)
1. 主題:mouse interaction
step 1:由茶壺來修改

先打程式:
#include <GL/glut.h>
void display()
{
glutSolidTeapot(0.3);
glutSwapBuffers();
}
int main(int argc, char*argv[])
{
glutInit( &argc,argv);
glutInitDisplayMode(GLUT_RGB| GLUT_DOUBLE|GLUT_DEPTH);
glutCreateWindow("0416273");
glutDisplayFunc(display);
// gultMouseFuc(mouse);
// glutMotionFunc(motion);
glutMainLoop();
}
step2:
void mouse(int button,int state,int x,int y) //use mouse
{
printf("%d %d %d %d\n",button,state,x,y);// 測試mouse 正在做什麼
}

會產生四個數字 0 0 45 20 0 1 45 20
第一個0代表button 第二個0/1代表按下去/彈起來 45(x)/20(y)
step3:
加入這兩行
glColor3f(x/300.0,y/300.0,1); //讓mouse have color RGB 必須要有三個參數
glutPostOverlayRedisplay(); // output color

step4:
glutMotionFunc(motion); //兩個參數是因為按著滑鼠不動
glColor3f(x/300.0,y/300.0,1); //300 代表視窗大小

glutInitWindowSize(500,500); //小黑窗大小

step5:
記住你想要圖形的座標

step6:
void display()
{
glBegin(GL_POLYGON);
//glutSolidTeapot(0.3);
glVertex2f(-0.03,0.43);/* 打自己的座標
glVertex2f(-0.50,-0.29);
glVertex2f(0.43,-0.35);
glVertex2f(0.24,-0.04);
glVertex2f(-0.28,-0.02);
glVertex2f(-0.01,-0.32);
glVertex2f(-0.01,-0.58);
glVertex2f(-0.26,-0.45);
glVertex2f(0.24,-0.45);
glVertex2f(-0.25,0.49);*/
glEnd();
glutSwapBuffers();
}

step7:畫圓

今天要教如何實作:glutMouseFunc();// gultMotionFunc();// 如何製作滑鼠動作(圓形/移動)
1. 主題:mouse interaction
step 1:由茶壺來修改

先打程式:
#include <GL/glut.h>
void display()
{
glutSolidTeapot(0.3);
glutSwapBuffers();
}
int main(int argc, char*argv[])
{
glutInit( &argc,argv);
glutInitDisplayMode(GLUT_RGB| GLUT_DOUBLE|GLUT_DEPTH);
glutCreateWindow("0416273");
glutDisplayFunc(display);
// gultMouseFuc(mouse);
// glutMotionFunc(motion);
glutMainLoop();
}
step2:
void mouse(int button,int state,int x,int y) //use mouse
{
printf("%d %d %d %d\n",button,state,x,y);// 測試mouse 正在做什麼
}

會產生四個數字 0 0 45 20 0 1 45 20
第一個0代表button 第二個0/1代表按下去/彈起來 45(x)/20(y)
step3:
加入這兩行
glColor3f(x/300.0,y/300.0,1); //讓mouse have color RGB 必須要有三個參數
glutPostOverlayRedisplay(); // output color

step4:
glutMotionFunc(motion); //兩個參數是因為按著滑鼠不動
glColor3f(x/300.0,y/300.0,1); //300 代表視窗大小

glutInitWindowSize(500,500); //小黑窗大小

step5:
記住你想要圖形的座標

step6:
void display()
{
glBegin(GL_POLYGON);
//glutSolidTeapot(0.3);
glVertex2f(-0.03,0.43);/* 打自己的座標
glVertex2f(-0.50,-0.29);
glVertex2f(0.43,-0.35);
glVertex2f(0.24,-0.04);
glVertex2f(-0.28,-0.02);
glVertex2f(-0.01,-0.32);
glVertex2f(-0.01,-0.58);
glVertex2f(-0.26,-0.45);
glVertex2f(0.24,-0.45);
glVertex2f(-0.25,0.49);*/
glEnd();
glutSwapBuffers();
}

step7:畫圓

void display()
{
glClear(GL_COLOR_BUFFER_BIT| GL_DEPTH_BUFFER_BIT);
glBegin(GL_POLYGON);
for(float angle=0 ; angle<3.1415926*2;angle+=0.01) // 修改
{
glVertex2f(cos(angle),sin(angle)); 圓 角度
}
glEnd();
glutSwapBuffers();
}
2017年3月6日 星期一
Week02
Week02_hw1
今天我們要使用code block 來做旋轉三角形。
先下載老師放在facebook的檔案。
先開啟一個專案 file--New--project 選擇OpenGL project - next -- 建立專案名稱(project title)andfinish。
在開一個專案file--New--project選擇GLUT project -- 建立檔名(project) and
檔案放桌面(desktop)--next--選擇下載檔案--and finish。
現在我們來做從無到有的"茶杯"。
由老師給的檔案開啟程式碼後來做茶杯,把不重要的刪掉 and 做完後一開始是黑屏

後來加上 glutSolidTeapot(0.2); 茶杯就跑出來了。

成果

如果想要修改茶杯顏色話,加入( glColor3f(0,0,0,); )但是要放在茶杯前面程式碼

// 程式碼(茶杯)
#include <GL/glut.h>
static void display(void)
{
glColorsf(0,0,0)
glutSolidTeapot(0.2);
glutSwapBuffers();
}
int main(int argc,char *argv[])
{
glutInit(&argc,argv);
glutInitDisplayMode(GLUT_RGB | GLUT_DOUBLE |GLUT_DEPTH);
glutCreateWindow("123");
glutDisplayFunc(display);
glutMainLoop();
}
Week02_hw2
用googl搜尋 http://jsyeh,org/3dcg10
download data and win32 and glut32.dll (藍色字)
mtlobj
下載完檔案後,解壓縮data and win32 and glut32.dll。
data.zip--desktop\window\data\mtlobj
windows.zip--desktop\window\Shape.exe
glut32.dll--desktop\window\glut32.dll
今天我們要使用code block 來做旋轉三角形。
先下載老師放在facebook的檔案。
先開啟一個專案 file--New--project 選擇OpenGL project - next -- 建立專案名稱(project title)andfinish。
在開一個專案file--New--project選擇GLUT project -- 建立檔名(project) and
檔案放桌面(desktop)--next--選擇下載檔案--and finish。
現在我們來做從無到有的"茶杯"。
由老師給的檔案開啟程式碼後來做茶杯,把不重要的刪掉 and 做完後一開始是黑屏

後來加上 glutSolidTeapot(0.2); 茶杯就跑出來了。

成果

如果想要修改茶杯顏色話,加入( glColor3f(0,0,0,); )但是要放在茶杯前面程式碼

// 程式碼(茶杯)
#include <GL/glut.h>
static void display(void)
{
glColorsf(0,0,0)
glutSolidTeapot(0.2);
glutSwapBuffers();
}
int main(int argc,char *argv[])
{
glutInit(&argc,argv);
glutInitDisplayMode(GLUT_RGB | GLUT_DOUBLE |GLUT_DEPTH);
glutCreateWindow("123");
glutDisplayFunc(display);
glutMainLoop();
}
Week02_hw2
用googl搜尋 http://jsyeh,org/3dcg10
download data and win32 and glut32.dll (藍色字)
mtlobj
下載完檔案後,解壓縮data and win32 and glut32.dll。
data.zip--desktop\window\data\mtlobj
windows.zip--desktop\window\Shape.exe
glut32.dll--desktop\window\glut32.dll
訂閱:
文章 (Atom)